Sample Core Was Thinly Cut and Freezedried Beef
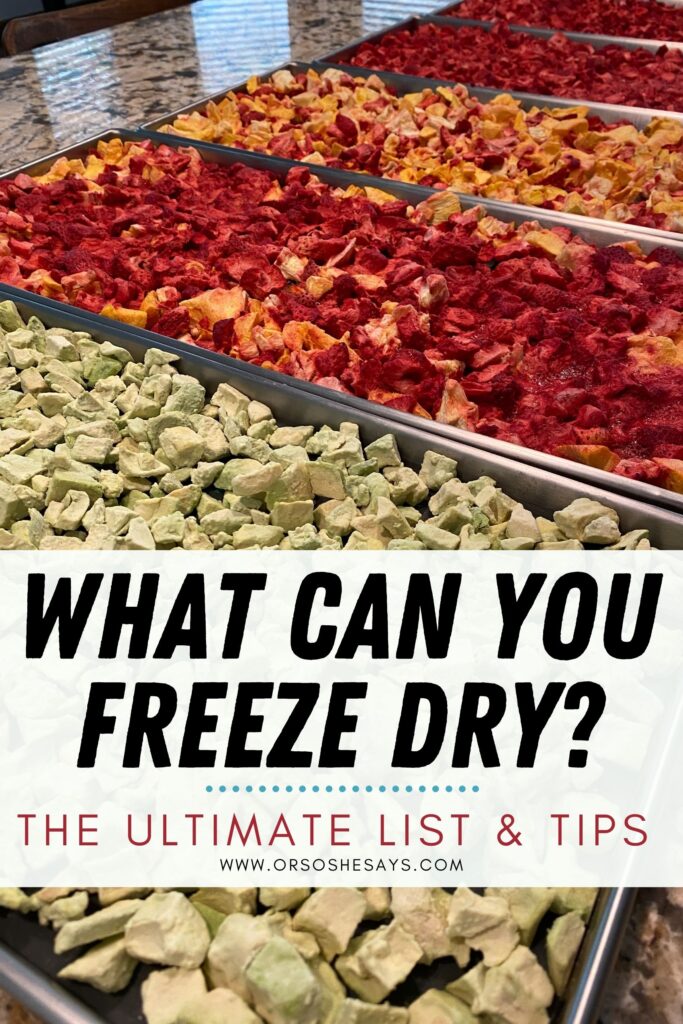
If you would have asked me about freeze drying last year, I could have told you absolutely nothing. But, things are DEFINITELY different now. My freeze dryer has been running non-stop for months and months. I've dried everything from meats and veggies to ice cream sandwiches and cheesecake. I've learned a lot, along the way, about what works, what doesn't, and some of my favorite foods to freeze dry. I wanted to put together a list of foods you can put in your freeze dryer, but not just any list… I'm talking the ULTIMATE list and freeze drying tips. I will continue to update this post, as I continue my freeze drying adventures.
Foods You Can Put In Your Freeze Dryer
I divided these freeze dried food ideas into the following categories: fruits, vegetables, meats, dairy, sweets, and miscellaneous. It's always nice to have a variety of food on hand for home use and emergency preparedness. Hopefully, this list will give you lots of great ideas to get you on your way!
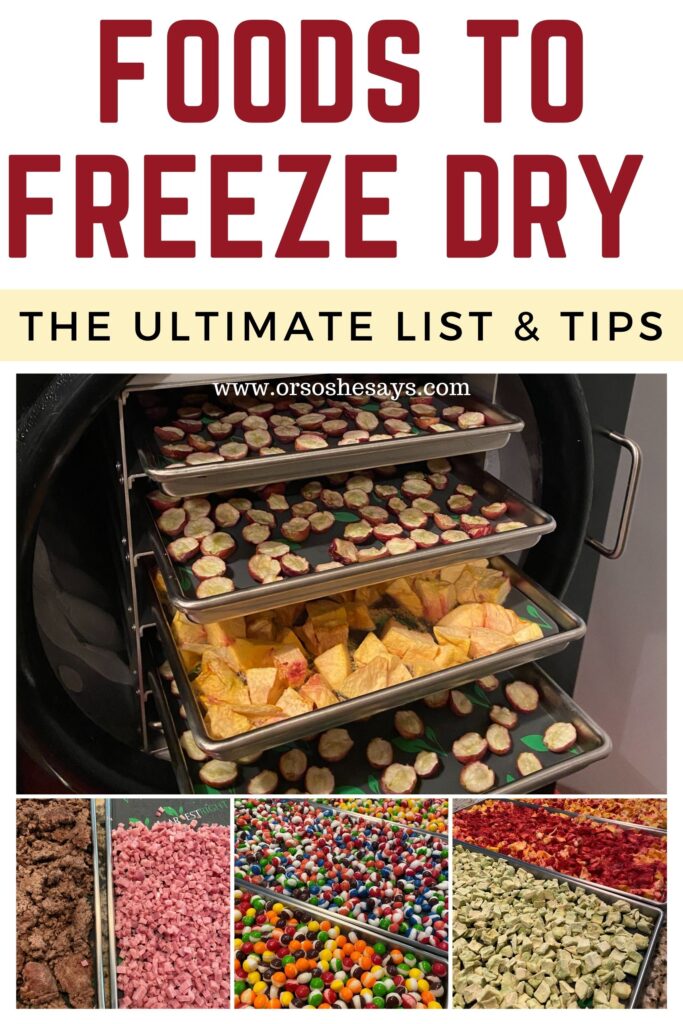
But, before we get to it, I should probably tell you about my freeze dryer. I purchased mine from Harvest Right and have been LOVING every minute of owning it. Yes, there was a 2 month waiting list when I bought mine, and it may be a little longer now. So, if you're thinking you want one, I wouldn't delay too much longer!
If you're wondering… I opted for the largest size, with the oil free motor. I have a large family and wanted to bang out a bunch of freeze dried food in fewer loads. The oil free motor is more expensive, but after talking to other Harvest Right owners, I figured it was worth it to not deal with buying or changing the oil after the food batches.

Okay, on to the list!!
.
Fruits to Freeze Dry:
- Grapes – Slice in half and place on trays, side by side, with the skin side facing down. These are one of my favorite fruits to freeze dry. Grapes are extra sweet when all of the water is removed! These make a great snack.
- Apple Slices – Slice your apples and dip them in a lemon water bath, to keep them from browning before they're freeze dry. If you stack them up, assuming they're not too tall, you can fit more on a tray. Want to try something amazing?? Drizzle caramel sauce over the sliced apples, before putting them in the freeze dryer. The caramel will dry onto the apples, making an awesome crisp snack!! (This is also great on peaches.) You can also sprinkle cinnamon/sugar on them beforehand. Apples are also perfect for the millions of amazing apple recipes, like Apple Pie Biscuits.
- Pineapple – So yummy! The cycle takes extra long, because they're so juicy. But, it's one of my favorite things! Here's a tip to speed up the drying time: have the pineapple already frozen BEFORE putting it in the freeze dryer. It will shave hours off the cycle time!
- Blueberries – I recommend poking needle size holes into the blueberries, to puncture the skin, and allow for better drying. Try them in these Blueberry Bars!
- Strawberries – Slice, to keep them under the height of the tray's rim. Strawberries make so many amazing recipes, like my favorite Strawberry Cupcakes, Strawberry Pie, or Strawberry Salad.
- Mango – So great for smoothies and these Mango Coconut Popsicles!
- Mixed Fruit – Bags of frozen mixed fruit are so easy to dump on the trays. I often chop the bigger chunks smaller, to keep it under the height of the tray's rim. These are great for smoothies or homemade ice cream.
- Peaches & Apricots – Make the fruit from your trees last 25+ years! Or, buy bags of frozen peaches, to keep things simple. Use your freeze dried fruit to make this No Churn Peach Ice Cream or this family favorite Peach Dessert.
- Bananas – I prefer slicing fresh bananas, as opposed to frozen. The frozen bananas left more sugar juice, which is fine, but the fresh banana slices look a little prettier. The frozen bananas look brown and pretty ugly. They should taste the same though! Bananas are great for soooo many things: Banana Bread, Banana Cake, banana chips, smoothies, cereal toppings, Banana Pancakes, etc.
- Lemons & Limes – Slice these thin and lay them side by side. So great for lemon or lime water, Honey Lemon Lime Carnitas, or Lemon Cream Chicken Pasta.
- Watermelon – I haven't tried watermelon yet, but I hear it's amazing! It becomes extra flavorful, once the water is removed. Plan on the batch running extra long, as there is lots of water in watermelon!!
- Raspberries & Blackberries – These turn out great! I just buy them fresh or frozen, dump them on the tray, and it's ready to go. After they are freeze dried, if you put them in a blender, you can make a fruit powder, that's great for so many things, like smoothies, frostings, ice cream, etc. Or, just package them whole. Use them to make delicious recipes, like: Raspberry Thumbprint Cookies with Lemon Icing (love these!!!), Easy Raspberry Ice Cream, or Blackberry Crumb Bars.
- Cherries – Most people simply pit and cut in half to freeze dry. But, I've heard of a method that helps prevent any chewiness or stickiness (basically, an incomplete batch.) The method is to blanch the cherries for two minutes, drain them, then put on the tray. A couple cherry recipes: No Bake Cherry Delight Dessert and Grammy P.'s Cherry Torte Bars.
Fruits That Are Often Called Vegetables
- Avocado – Yes, it's a fruit. You can buy huge bags of already chopped, frozen avocado at Costco. Dump on the tray and freeze! You can use it to make my favorite Avocado Feta Dip or as a topping on my family's favorite Black Bean Taco Soup.
- Olives – Olives are a fun addition to many dishes. I would store freeze dried olives in small mylar bags. Typically, you don't need a lot of olives for a recipe, such as Hawaiian Haystacks, so a smaller bag will help eliminate waste.
- Tomatoes – Just cut in slices or in half (if cherry tomatoes), set on trays, and you're good to go. After rehydrating, try these popular Balsamic Roasted Tomatoes.
- Zucchini – Zucchini chips, shreds, or zoodles are all awesome! No need to cook first. Zucchini is fun to add to Kung Pao Chicken or even in zucchini bread pancakes. You could also sprinkle ranch dressing mix on the zucchini before putting in the freeze dryer.
- Squash – Similar thoughts, as the zucchini. When chopping, keep the squash no more than half inch thick, it will dry better.
Vegetables to Freeze Dry
- Peas – I like to freeze dry vegetables that I know my kids will actually eat. Simply buy them frozen (I've heard they're pre-blanched that way), dump them on a tray, and freeze dry. It's totally fine if they overlap and stack, just keep the height of the peas under the rim. There is no need to puncture the peas before freeze drying. Serve peas on the side, with The Best Swiss Cheese Chicken Dinner.
- Corn – Corn is one of the main vegetables I freeze dry, because my family loves it so much! Feel free to let your corn in the tray overlap and stack on top of each other. I've never had any problems with it! Corn is great for adding to my favorite Taco Soup, the Easiest Chicken and Dumplings, or using it to make Paula's Deans Corn Casserole.
- Green Beans – If using fresh green beans, it's suggested to blanch them first. They tend to rehydrate better. Green beans are so healthy and also a kid favorite. You could use fresh, frozen, or canned green beans to freeze dry. Serve them on the side with this family-friendly Baked Ziti or cook them with bacon, as a side dish!
- Carrots – The best way to freeze dry carrots is to either dice them, slice them in to chips, or long spears. No need to blanch. Whole carrots are a little too thick. Carrots are incredibly handy to have in your home food storage. Add them to soups, eat them with a dip, or toss them in a salad.
- Onions – Do yourself a huge favor and buy freeze dried onions online. UNLESS, you're okay with stinking up your home and freeze dryer for a long time. That's all I have to say. 😉
- Broccoli – Once again, a stinky vegetable to freeze dry. My best tip is to cook the broccoli first (it will rehydrate better and retain it's color), then freeze it in a regular freezer. Use the pre-frozen setting on the freeze dryer (once it's frozen in the regular freezer) and transfer it over. This will help tone down the overwhelming broccoli smell.
- Beans – These legumes, often classified as a vegetable, are easily stored dehydrated for 30 years. You don't necessarily need to freeze dry them. However, I would definitely freeze dry soups and side dishes with beans, for convenience. Baked beans, Black Bean Soup, or White Chicken Chili are great ideas.
- Potatoes – Be sure to blanch the potatoes for a few minutes, drain, and pat dry, before putting on the trays. If you don't blanch the potatoes, they will turn brown. Keep all potatoes on the tray at 1/2 inch or smaller. These make great Parmesan Roasted Potatoes! I've also bought pre-made Au Gratin potatoes from Costco and freeze dried those. I'm excited to have something like that as a side dish!
- Mushrooms – This fungi is a favorite of mine. I bought a bag of frozen mushrooms from Costco, and freeze dried those. But, any packaged mushrooms will do. Although sliced will work best, if you can figure out a way to use sliced mushrooms in this recipe, you'll be so happy: Stuffed Mushrooms.
- Spinach/Kale/Greens – Isn't that so cool that you can freeze dry greens?! If it's not gardening season, who cares! You've got some perfectly great greens on hand. 🙂 I have 5 trays of spinach in my freeze dryer right now. I plan on blending it up, after it's freeze dried, to make a homemade green powder for smoothies. If I wasn't to blend them up this time, I would definitely keep some on hand for this Chicken Feta Spinach Sandwich… one of my top sandwich recipes!
Meats to Freeze Dry
- Ground Beef – The fat in meat doesn't freeze dry well and can turn your food rancid, if there is too much fat. Buy the leanest ground beef you can find. I like to cook it first, so it doesn't have to be cooked after rehydrating. After cooking and draining any fat, I put the meat in a colander and rinse the meat in hot water. This will help wash off any remaining fat. After these steps, I pat dry with paper towels and place on the trays to freeze dry. Meats with fat, even when rinsed, may have a shorter shelf life… more like 5 to 10 years. Try the ground beef in this Italian Stuffed Shells recipe.
- Chicken – To simplify things, I like to buy a pre-cooked rotisserie chicken from Costco, to shred. Or, bags of frozen pre-cooked chicken pieces from Costco. I'll just dump the chicken on the trays, chop any pieces that are too thick, and freeze dry. It's super easy! Here are over 50 chicken recipes that make great dinners. I've also put entire frozen chicken patties on trays and dinosaur nuggets. Both turned out great! To rehydrate those, I would wrap them in a damp paper towel.
- Ham – My favorite way to freeze dry ham is to buy the pre-chopped/cubed and cooked breakfast ham. The fat is so lean that there's no need to rinse or worry about fat. Ham will be great to have on hand for omelets or this Ham and Potato Soup.
- Turkey – Ground turkey, turkey pieces, or even sliced deli turkey all turns out beautifully. Very lean and good for you! Try this Garlic Cheese & Turkey Quiche.
- Pork – I haven't done pork yet, but I think I would only bother if it was really lean. I would likely cook it in the crock pot first, then shred it to put on the trays. The family will love having BBQ pork or this Pulled Pork Pepperjack Mac and Cheese.
- Beef – I don't cook a lot with beef, but I know people that have freeze dried thin slices of steak. I plan on buying lean stew meat from Costco, cooking it in the Instant Pot with some broth, then freeze drying the pieces, when they're done. I have freeze dried pre-made Beef Stroganoff from Costco. Turned out perfectly!
- Eggs – Yes, I know eggs are not meat, but they're also not dairy. So, let's put them here, since it's a great source of protein! I have the large freeze drying unit, and can fit about 18 eggs per tray. I crack them into a bowl, whisk them, then pour them into empty trays, that are already sitting in the freeze dryer. I just pull them out a couple inches, pour the eggs in the tray, and carefully push it back in. Then, I go whisk 18 more eggs for the next tray. Eggs are such a cool thing to have available. You can have fresh-like eggs at any time, no chickens or grocery store needed! Perfect for scrambled eggs and baking.
Dairy to Freeze Dry
- Yogurt – You know those yummy yogurt drops for babies?? Yep, you can make your own, and not feel bad about keeping them for yourself. But, here's a tip… DON'T do Greek yogurt. It doesn't turn out well. Everyone in the freeze drying community will tell you that regular Yoplait yogurt works the best. Some people like to spread the yogurt on the tray and break it apart, like bark. Others like to put the yogurt in silicone molds, freeze them into a cute, uniform shape, then pop out onto the tray to freeze dry. Personally, I dump the yogurt into a Ziplock bag, cut off the corner and squeeze out little drops onto the tray. Every once in a while, a fruit chunk will clog it up, but it's easy enough to pick out and continue on.
- Milk – Freeze drying your own milk is so much better than using the dehydrated milk… it has a nicer flavor, not so chemically. If you have space in your deep freezer, I would probably freeze the milk on the trays first, to cut down on freeze drying time. If you don't have space and don't mind it taking a while, just go for it! I have never frozen it before freeze drying. I simply put my trays in the freeze dryer, empty. Then I pull one out, just a few inches, and start pouring milk into the tray, about 3/4 the way to the top. I carefully push the tray back into the shelf and move on to the next tray. I've never done whole milk, only the 1% that my family likes to drink.
- Cream Cheese – I love the idea of having cream cheese on hand! It can be used in so many recipes, such as cheesecakes, soups, and dips. To freeze dry, I made sure the cream cheese was really cold, first. Then I quickly cut the bars into 8 sections each, and placed each 1/8th piece onto the tray. Once the cream cheese was done in the freeze dryer, it retained it's shape, but quickly crumbled, after being placed in the bag. I put two whole bars (16 pieces) into each bag, and labeled it that way. Now, if a recipe calls for one bar of cream cheese, I'll know how much of the bag (as it's essentially become powdered cream cheese) to use. Do yourself a favor and try these Strawberry Cupcakes with Strawberry Cream Cheese Frosting. They're amazing!!
- Sour Cream – This is another great ingredient to have on hand. I buy the big tubs of sour cream and spread it all over the tray. It also becomes crumbly. I like to store sour cream in small bags, because typically not a lot of sour cream is needed for a recipe. Sour cream is the best topping for this Green Chili Nacho Casserole.
- Ice Cream – Be sure to pre-freeze your freeze dryer, before putting any ice cream inside. And, make sure your ice cream is super cold/frozen, as well. You don't want any melting happening! I've done lots of ice cream sandwiches, and they have turned out great. I like to slice them into bite-sized pieces, before putting them on the tray. I would not recommend trying to reconstitute ice cream sandwiches. It will be pretty complicated. But, they're super fun to eat dry! However, you can rehydrate the ice scream scoops by spritzing them with milk, and letting it sit before adding more milk, until it suits you.
- Cheese – Cheese is one of the best things to freeze dry, in my not-so-humble opinion! I've done trays of shredded mozzarella cheese for Italian dishes, like Chicken Pesto Pizza. I've also done Parmesan for toppings and recipes like Chicken Alfredo. And of course, I've done lots of shredded cheddar cheese (big bags from Costco), to use for practically everything! It's great for making nachos, adding to omelets, into soups, or in recipes, like these Cheddar Biscuits. I really load the trays up and it turns out perfectly.
- Eggnog – Never miss out on your eggnog Christmas tradition, by having some freeze dried and tucked away! How cool is that!? You can pre-freeze, to speed up the freeze drying process. Or, simply pour them into the empty trays, already sitting on the freeze dryer shelf. Carefully push them back into place.
Treats to Freeze Dry
- Skittles – I've tried lots of candies in my freeze dryer, and Skittles are definitely the best! Buy the big bulk bags at the store, because you're going to be addicted and fighting off your family and friends. Tbere's a special trick for cutting down the time needed to freeze dry Skittles, that I share in this post: How to Freeze Dry Skittles in 6 Hours.
- Jolly Ranchers – Okay, these are also the best. 🙂 They puff up into shiny, colorful, crunchy globes. They look so cool and I love them even more than the original thing. The tricky thing with Jolly Ranchers is that they can get pretty big on the trays, and sometimes scrape the top of the shelves, when you try to pull them out. I recently heard a tip to cut them in half… and yes, you can do that with sharp kitchen shears. You might want to cover your hand, with the scissors and candy, with a non-fuzzy towel. This will help prevent any Jolly Ranchers from shooting across the room, when you make your cut. You don't HAVE to cut them in half, but I think I'll try it next time. These can also be added at the end of a food cycle, just like the Skittles (see the link above for instructions.)
- Other Candies – Salt Water Taffy (cut in half), Milk Duds, Big Hunk, Werther's Originals, and Bit O Honey, are probably the most popular candies to freeze dry, besides the Skittles and Jolly Ranchers. Chocolate doesn't work well, because of the fat content, although Milk Duds work okay… I just wouldn't store them. PERSONALLY, I don't like any of the candies in this list, but that's just my taste. I only like the Skittles and Jolly Ranchers. I may give AirHeads a try, and see if those turn out. Oh, don't bother with candy corn… they turn hard as a rock!
- Marshmallows – Marshmallows are another sweet that can be added at the end of a food cycle, by clicking "More Dry Time." I just pull the food out, put marshmallow-filled trays inside, and add 6 more hours of dry time. See the link shared about Skittles above, for detailed instructions. Anyway, I like to have marshmallows for cereal treats, like these Chewy Gooey S'mores Bars, and hot chocolate.
- Ice Cream Sandwiches, Bars, and Ice Cream – See notes in the dairy section.
- Cheesecake – Buy pre-frozen cheesecakes, chop into bite-size pieces, and freeze dry! These will be harder to reconstitute, so I would probably eat them dry.
Other Foods to Freeze Dry Ideas
- Chicken and Beef Stock – Think of how often you use chicken or beef broth and stock. Soups! Instant Pot recipes! Pre-freeze, to speed up the freeze drying process. Or, pour the liquid into the empty trays, already sitting on the freeze dryer shelf. Carefully push them back into place.
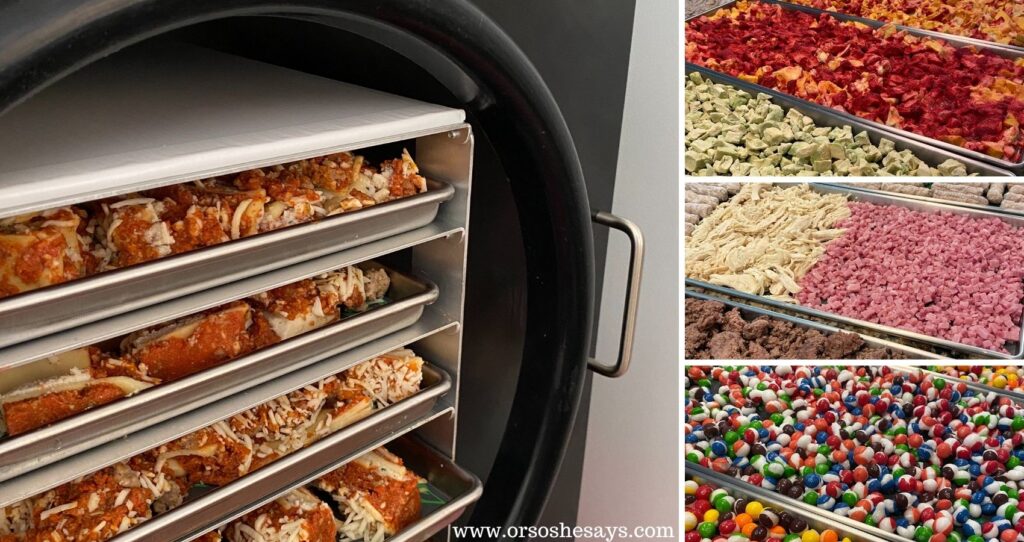
- Fully Prepared Meals – I have bought prepared meals from Costco, such as Beef Stroganoff and Lasagna, and put it on the trays to freeze dry. It's so nice knowing that I have some ready-to-eat (after adding water) meals available for times I don't feel like cooking. With the lasagna, I just cut it up in small squares and placed it on the tray. The beef stroganoff, I spread out on the trays. But, really you can freeze dry so many meals! I've been wanting to do some chicken Alfredo, casseroles, chicken fried rice, etc.
- Soup – This could fall under "fully prepared meals," but I just wanted to really blast how great this idea is! It's so easy to make a huge batch of soup, which can easily give you several trays full of meals to freeze dry and have ready-to-go. Here's a helpful list of 35 fall soup recipes to try.
How to Reconstitute Freeze Dried Food
There are a handful of different options for rehydrating freeze dried food. It basically just depends on WHAT you are rehydrating. Some food items need, and can handle, a lot of water for rehydration. Others can only handle smaller amounts, without being ruined. I'm not going to list out each item for you, as it's fairly intuitive. When in doubt, start with less water, then add more, if needed.
- Soak in Water – If I was to rehydrate something like a steak or some types of fruits and vegetables, I would place it in a bowl of cold water and let sit (possibly overnight) until done. Afterwards, pat dry with paper towels and heat/cook (if meat), as usual.
- Spray with Water Bottle – There are some foods that you don't necessarily want to drop in a bowl of water. In that case, I would spritz them with a bottle of water and let sit. If the food item needs more hydration, I would repeat the process until ready.
- Place Between Damp Paper Towels – If you're reconstituting a food that can get too soggy, take a damp paper towel and surround the item with it, until done. You could also place it in a Zip Lock bag with a damp paper towel. A good example of this would be banana bread.
- Add to Wet Ingredients – If you are adding freeze dried food to already wet ingredients, there is no need to rehydrate first. For example, freeze dried corn can be added to soup, as it.
Foods That Don't Freeze Dry Well
There are a few foods that don't do well in a freeze dryer. Freeze dryers pull WATER from the food, not oil/fat. So, the more fat that is in an item, the less likely that freeze drying will work. The food item may appear to be done, but if the outside has a coat of fat on it (even a little bit), it can quickly go rancid in storage bags. Also, an ultra-high sugar content will often cause difficulty too.
Here are some common foods that aren't good to freeze dry:
- peanut butter
- pure chocolate
- butter
- honey
- syrup
- jam
Freeze Drying Tips
- I mix different foods together all the time, on my trays. However, I recommend not combining savory with sweet, in the same batch. You don't want your chicken tasting like bananas.
- Keep liquid and non-liquid batches separate.
- If your batch is done, but you're not ready to pull it out and bag/can it yet, just leave it. Yep. You can even leave it in your machine overnight, if needed. I heard that straight from Harvest Right! Just leave it alone, after it says complete. It will freeze the food inside, to keep it until you're ready.
- After defrosting the machine, if you find water sitting at the bottom of the barrel, simply lift the front of the machine up a couple inches, and it will drain out the back. I actually have the front of my machine permanantly propped up on a small board to help the water drain. But even with that, I still lift mine (it can be heavy), after each load, to fully drain.
Favorite Accessories for Freeze Drying
- Rolling Cart – I keep my freeze dryer in the garage on this rolling cart from Uline. It makes it nice to be able to pull the machine away from the wall and access the back side, grab my bucket for dumping the drained water, etc.
- Mylar Bags – I don't have a machine for sealing #10 cans, so the easiest thing for me to do is store my freeze dried food in mylar bags. I like to buy mine in bulk from PackFresh, in a few different sizes. I like gallon size ones for items that I know we will consume all of it fairly quickly (within a week, or so.) For food where not as much is needed, at first opening of the bag, I like to store in 2 quart or 1 quart bags. For example, I would never need a lot of chopped onions at once, so I would store the freeze dried onions in the smallest bags I had on hand.
- Oxygen Absorbers – I also buy these in bulk from PackFresh, in the packs of 10. It's nice to have them in bundles of 10, because you don't risk exposing a huge bag of oxygen absorbers to the air for too long. You can work with 10 at a time, then open the next package up, as needed. The minute I open up a 10 pack, I quickly transfer them (and the dot indicator) to a small canning jar and screw the lid on. I use what I need to package my food, then screw the lid back on, if there is leftover packets in there. The next time I get around to packaging food, I only open that jar if the indicator is pink again. If it's not, then I open a new 10 pack and put them in a new canning jar to use right then. By the NEXT time I'm ready to pack food, the first jar would be pink again. Basically, I alternate between 2 jars. Also, I usually buy the 500 cc packets. I know that is likely overkill for small mylar bags, but I like to use these packets in 5 gallon buckets too, so I use them for both.
- Silicone Molds – If you like to make yogurt bites, you can either do it the ugly-ish way (like I sometimes do), and just squirt drops from a pastry or Ziploc bag onto the tray. OR, you can put drops in semi-circle silicone molds, put them in the regular freezer, then when they're done, pop them out onto the trays for freeze drying. They give your yogurt dips a prettier, more professional look.
- Storage Bins – The last thing you want, after all your freeze drying efforts, is to have rodents discover your mylar bags of food. I like to store my food in these 31 gallon buckets, stacked on top of each other. I separate them by category, so it's easy to find what I'm looking for. I have a bucket for: Meats, Fruits, Veggies, Dairy (cheeses & sour cream), Milk, Sweets, and Full Meals. Luckily, freeze dried food is super light weight, so it's easy to fill them completely full and move them, as needed.
Pin This Image to Save Freeze Dryer Food Idea Post:
If you liked this food storage post, check out:
- 10 Ways to Protect Family Life ~ Be Safer By the End of the Year
- 26 Cheap Camping Tips and Tricks
- 52 Fun Activities for Bored Siblings
Source: https://oneshetwoshe.com/freeze-dry-foods-list/
0 Response to "Sample Core Was Thinly Cut and Freezedried Beef"
Post a Comment